Wednesday, 26 September 2012

Patchwork Baby Quilt Tutorial


As I am sure I have said before, it is baby season in our life at present, and I decided I was in need of a new challenge. With a friend's baby shower coming up, I decided to attempt making a small quilt for the baby to play on. With my Mum, the master quilter, on hand for advice, I was ready to begin, and I was quite elated at how the quilt turned out. I am a bit of a cheat as no actual hand quilting was involved, so this is a relatively easy little number to put together.

To make your own patchwork baby quilt (finished quilt measuring 92cm x 69cm or 36" x 27") you will need:
  • 1 meter (1.5 yards) fabric for backing of quilt
  • 75cm (1 yard) each of two other fabrics for the face of the quilt
  • 1 meter (1.5 yards) of batting (we used 'Poly-down', a polyester, machine washable, non-allergenic batting available from quilt shops)
  • 4 metres (4.5 yards) of bias binding tape to match your quilt
  • cotton to match your fabrics
  • Curved safety pins (from fabric shops)
  • Masking tape

1. It's a good idea to wash, dry and iron all your fabric before you begin.


2. The quilt face is made up of 9 rectangles, 5 from one fabric and 4 from the other. Cut your pieces using a rotary cutter if you have one.

I wanted my finished quilt about 70cm x 90cm, so cut the blocks  32cm (12.5") x 25cm (9.5"), as we will include a 1/4" seam allowance.

3. Lay out the pieces in the pattern you would like them,
and then take the three pieces in each row, place them face to face and pin together. You should end up with three rows of three.

4. Using a 1/4" seam, sew the pieces together, then give a good iron.

5. Now place the rows face to face, pinning them in place, and then sew them together. Now you will have the completed face for the quilt.

6. Lay out the fabric for the backing of the quilt face down on a clean, flat surface and tape down the
edges with a little masking tape to secure.

If you like, you can spray the upward facing surface of the fabric with a quilt basting spray (available from fabric shops) which will leave the surface lightly tacky, and stop the batting moving around when you place it on.
  
7. Next we will lie the batting over the fabric and smooth it out. If using the spray, spray again before the next step.

8. Then lie the quilt top face up on top of the batting. The backing and the batting should overhang the edge of the face slightly as we haven't cut them to shape yet.

9. Now pin the three layers together. I used curved safety pins which make the job much easier, and pin all around the edge, along the seams and in the middle of each block.

10. Now we will sew along the seams of the quilt face to secure it in place. It is best to use a walking foot on your machine for this, as it helps feed the fabric through and prevents it bunching up.

11. Sew right along the seam lines of both the horizontal and vertical seams.

12. I was also wanting diagonal quilting on the face of the quilt. For this part, run a long line of masking tape from the corner of each square right across to the other corner and through to the other side of the quilt.

Make all the lines in one direction, then sew along the tape edge.

When all the lines are done, remove the tape and repeat for all the squares in the other direction.

13. Now run a seam an 1/8" in from the entire border of the quilt, then remove all the pins (if you haven't already done so). Don't worry about this seam, it will be hidden under the binding.

14. Next, trim up all the sides so you are left with a nice neat, straight edges.

15. Now pin the bottom edge of the binding just under half it's width form the quilt edge (eg. if it is 1" thick, pin it a little less than 1/2" form the edge). 

For a nice finish, use mitred corners. 

(see 'Sew to Speak' for how to do this). 

16. Sew the binding down by sewing along the top fold of the binding, then flip it over the top and pin to the backing.
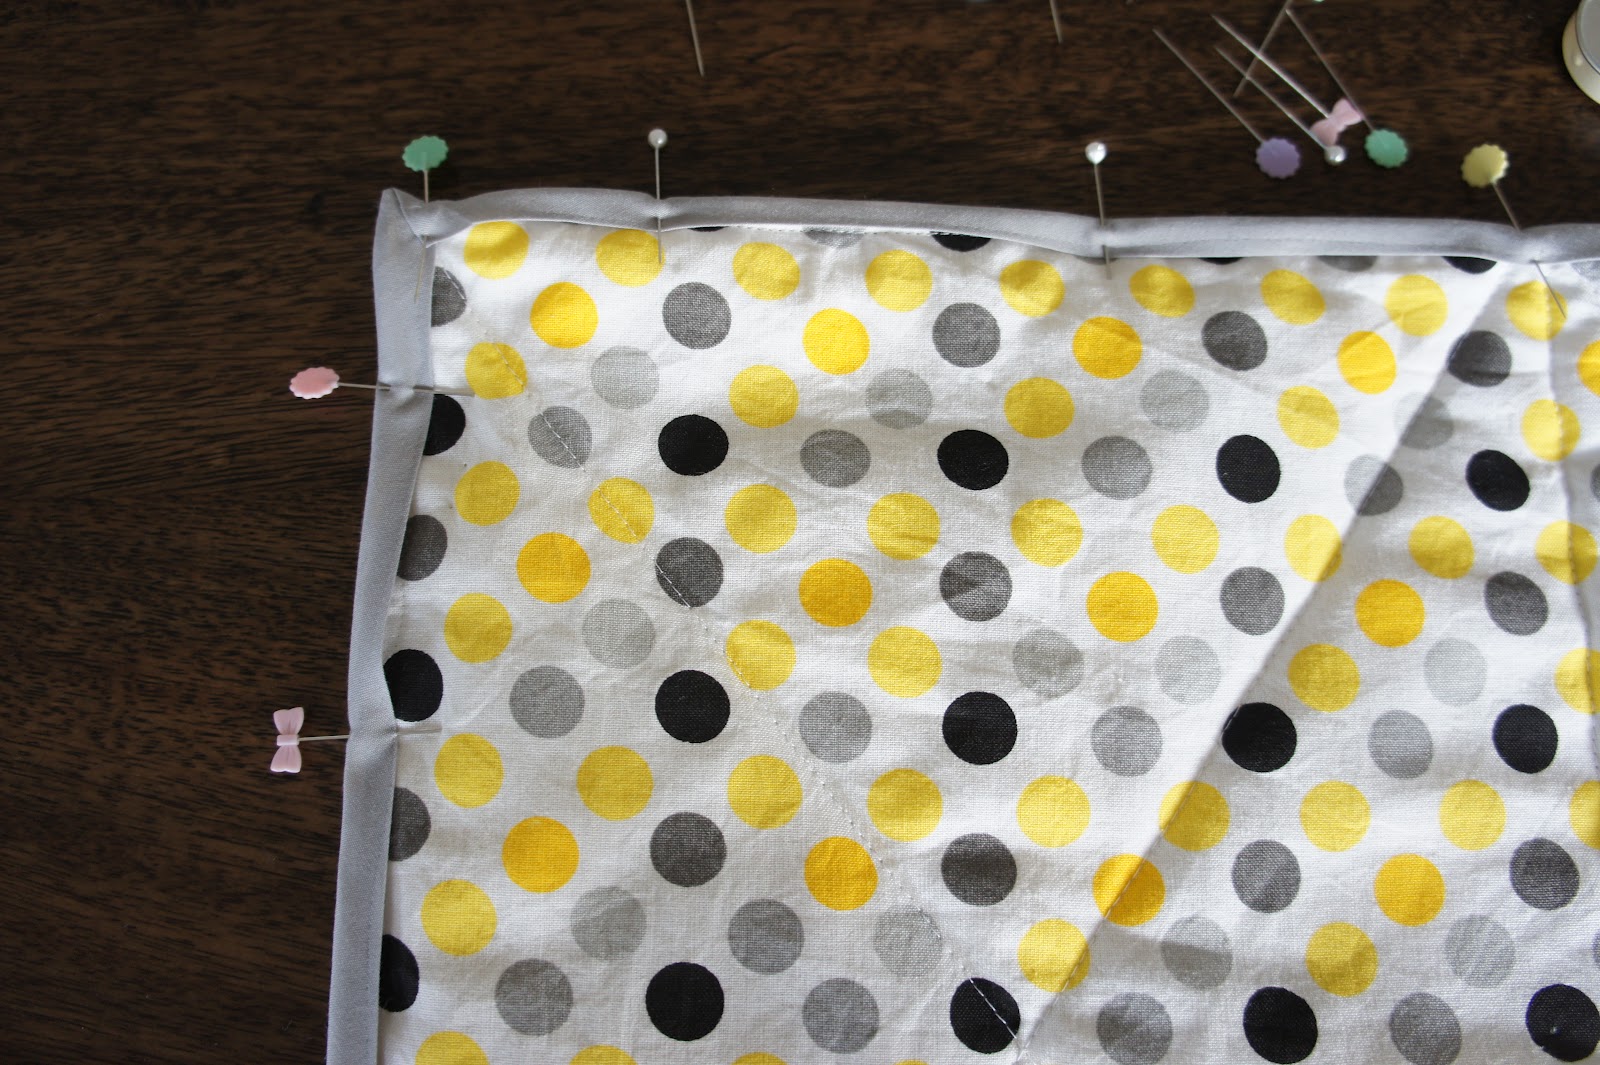
I then machine sew the binding down from this side too (because I am lazy), and to do this you sew it from the front side, right along the bottom of the binding, and this captures the other side too. For good tips on attaching the bias binding by machine see 'Little Chicken's No Swearing Method'.

This method didn't leave as nice a finish as it would if you hand sew it, which is what I will do in future. 

17. You are finished! Now sit back, and enjoy the thrill of having made something lovely, all the while thinking of someone you treasure and the little someone about to bless their lives!

xx

Monday, 13 August 2012

Soft fabric children's book


I wanted to make a fabric book for my daughter, and was tossing up ideas about an alphabet book, or something with appliqué animals, then I found this fabric with fusible backing that you can print straight onto with your ink jet printer and then iron directly onto fabric, and I thought how nice it would be to make a book of our family, so when they are not with us we can continue to talk about them and show Ruby pictures.

We had lots of this cute fabric left over from covering hay bales at our wedding, so I used that and batting to make the book pages. I had to hand sew the pages together as the finished book was too fat to fit in my machine, but otherwise it was a pretty straight forward endeavour.


I love this little book, and think that as Ruby gets bigger she will too, it was already a hit with my 3 year old nephew.

My favourite part is the last page, where there is a little mirror so she can see herself. I love that whatever age she is, she will be able to look in and there she will be.


For tips on how to assemble a fabric book try Lella Boutique or Don't call me Betsy.

xx

Friday, 10 August 2012

Easy reversible baby dresses


I have been a little bit obsessed with Pinterest of late, so much so that I often find myself so busy pinning things to make that I run out of time to actually make anything. So, with an upcoming holiday to sunny Noosa a few weeks away I decided to try my hand at finally making an item of clothing for our little Ruby. I enjoyed it so much that I cracked on and made two!

This pattern I found on Pinterest, and it was very easy to follow. This pattern, and many other gorgeous kids patterns, can be purchased online from Tie Dye Diva Patterns.

xx

Monday, 23 July 2012

Handmade baby shoes


This has been my most challenging sewing attempt to date, so much so that I actually have not sewn anything since completing these little numbers. However, after seeing little Ruby wear these with her christening dress last week it was well worth the effort... and the swearing, and all the unpicking and re-sewing each shoe cost me. I especially loved my Mum's comment when I told her I had finished them, but that I had struggled quite a bit "Yes, I thought that might have been a bit over ambitious for you". 
Ah, hindsight - my old, dear friend. 
Note to self Holly: you are not yet 'intermediate' with your sewing ability, you would be best to stick to patterns that say 'beginner' or 'novice', or just return to the kitchen where things tend to run a little smoother (most of the time).
In saying all of this, the pattern for these shoes was brilliant and really easy to follow, and came with several different size options which I think I will make again in the future though for a slightly larger foot next time, so as not to be quite to fiddly. Also the fact I now know that 'fusible webbing' and 'fusible interface' are not, as I had assumed, the same thing I think the shoes will be much easier when they are not slightly sticking to each other as I try to sew them - major learning curve accomplished.

To make these shoes for yourself, the pattern can be purchased from Winter Peach Patterns on Etsy.
Happy stitching. 

xx

Monday, 16 July 2012

My baby's bunting


We recently had our beautiful Ruby Grace baptised, and celebrated with a small lunch back at our house. In her honour, I wanted to make something pretty for decoration and decide on some bunting to hang behind the food table, with the intention to then hang them in her nursery afterwards. I scoured the internet for a pattern that I liked, and after many slight variations this was how I got on.

For one 3 metre garland (2.3m of flags, with room at each end to tie) you will need:

  • Cardboard triangle measuring 12.5cm along the base, and 17.5cm on the other two sides
  • 7 different but complimentary fabrics
  • 3 metres of inch wide bias tape

1. Wash, dry and press your fabrics and the bias tape.

2. Using your cardboard triangle template, cut six triangles (3 pairs) out of each of your fabrics.


3. Place two triangles of the same fabric face to face, and sew down the two long sides, from base to tip, leaving the base completely open.

4. Snip the tip off the end, and turn right side out. You may need to poke a pencil into the tip to get it to come to a nice point on the right side, then give it a really good iron. Trim any extra seams that poke out from base so you have a nice straight base edge.


5. Repeat with remaining pairs of triangles so you end up with 21 completed pendants.


6. Fold the bias tape in half and press well, then lie the tape out flat along the table (or floor if your table is shorter).
Leave a 35cm length of tape at each end (to be used later to tie up your bunting), then start placing the bases of the pendants corner to corner along the inner fold if the bias tape.


7. When you are happy with the order of your pendants, pin them into place and sew a seam all the way along the row, about 5mm from the edge of the tape. I actually sewed two seams one a few mm lower to make sure they are really secure.


That's it! I loved making these, and found it a really pleasant way to spend a Sunday "crafternoon", and they looked very pretty on the day.

xx


Thursday, 5 July 2012

Carrot cake cookies


Just to prove I have not completely neglected my oven, here is a little taste of what we have been enjoying in our household of late. I love these cookies, but restrict myself to only baking them for very special occasions, and a friend's baby shower was the perfect excuse to bring them out... much to my husband's delight. This is a recipe my sister gave me, and I am sorry I can't credit it more than that (though if you knew my sister and her amazing baking that would be credit enough), and these little morsels are always a winner. There is just something about the fluffy cream cheese filling sandwiched between those soft, cakey cookies that is a real treat to devour.

Ingredients:
  • 250gm softened butter
  • 1 cup packed brown sugar
  • 2 eggs, lightly beaten
  • 1 ½ cups self raising flour
  • ½ teaspoon all spice
  • 1 teaspoon cinnamon
  • 2 cups rolled oats
  • 1 ½ cups grated carrot
  • ½ cup sultanas
  • ½ teaspoon baking powder
  • ¼ cup chopped pecan nuts
Filling:
  • 50gm butter, softened
  • 75gm cream cheese
  • 1 teaspoon orange zest
  • 2/3 cup icing sugar (sifted) 
  1. Preheat oven to 180°C, and line 3 trays with baking paper.
  2. Beat butter and sugar until light and fluffy.
  3. Add eggs, one at a time, and beat well.
  4. Stir in sifted flour, baking powder, all spice and cinnamon.
  5. Add all remaining ingredients and stir until well combined.
  6. Cover and refrigerate for 30 minutes.
  7. Roll into balls (tablespoon size balls for big cookies/ dessert spoon size for a smaller treat), and place an inch apart on lined baking tray.
  8. Bake for 12-20 minutes, depending on size, or until lightly browned.
  9. Cool completely on wire racks.
  10. Combine all filling ingredients until fluffy. Add more icing sugar to taste if you need it.
  11. Sandwich biscuits together with the frosting, and dust with icing sugar.
I did dessert spoon size this time, and got about 30 of the completed cookies (60 individual biscuits).

I hope you enjoy these as much as we do.
xx 

Monday, 2 July 2012

Fabric children's blocks


I love these squishy foam blocks as toys for little hands to play with. I have given something similar as gifts in the past and have now taken up making them myself. My initial attempt was not very successful, partly because I bought styrofoam cubes not cushion foam (will blame baby brain for that one) and partly because the instructions I had did not give any measurements, so my first, sad little 'Ruby' cube was unpicked and re-sewn I think 5 times and still looks a bit ragged but I am sure our little cherub won't mind. I have also started adding little bells into the blocks, which helps stimulate another of the wee ones senses when playing with them.

So here is how I go about throwing one of these cubes together. 
You will need:
  • Foam cube (I use 10cm x 10cm, and the lovely chap at the foam shop cuts them to size for me)
  • 6 different fabrics cut into 10cm x 10cm squares, or whatever size your foam is
  • Needle and thread
  • Fusible interface
  1. Start by cutting your fabric squares. To personalise the block, I like to put the child's name on the blocks if I can (short names fit in one square, or I do 1 letter per square if 6 letters) so I trace their name onto fusible interface and cut it our of fabric to iron on. If you choose to do this, the fusible interface goes onto the back of the fabric so trace the letters inverted so they are backwards on the back of the fabric and the right way round on the right side (see below). I have also done ABC, numbers, and traced around cookie cutters for other shapes stick on to make the cube more interesting but you might just use lovely fabric and leave it plain.  
  2. Once you have prepared your squares, start by taking two squares and lying them patterned sides together, and sew together along one edge, leaving about 8mm seam. (Don't worry that it won't fit with the block and squares the same size, it just makes for a nice snug fitting cover) 
3. Continue sewing the squares together to form a 'T' shape. 
4. Flip it over and give it a good press.

    5. Continue sewing the remaining sides together (inside out)  to form a cube
    leaving one side of one square unstitched. Pull the fabric out through the open side to right way out.
6. The next step is inserting the foam cube, and if you decide to put a bell in to the block do that
    now. I just use small embroidery scissors to cut a small slit about half an inch wide down halfway in
    to the cube. Then poke your finger in to stretch it out a bit and push a bell down into the hole. The    
    bells I had were only 12mm and the foam can dull the noise so I put in 3 of them which gave an
    effect I was happy with.
 
To put the foam in, just screw it up in a ball and shove it in, then just straighten the fabric around the block as it pops back into shape. 

7. To finish your cube, hand sew the last seam closed using a drawing stitch if you can do one, I can not so just did the best I could...
...and you are done.


Enjoy! 
xx