Showing posts with label Sewing tutorials. Show all posts

Sunday, 17 February 2013

Sweet (and easy) little girls pocket skirt tutorial


I love these sweet little skirts. They are made to sit above the knee, so are suitable for crawlers, and look gorgeous on their own or over leggings. Plus they are very easy to make, and can be made in about an hour. The measurements given are for a girl about 9 - 12 months. Just make everything larger for a bigger size.

You will need:
  • 1/2 yard of fabric for skirt
  • 2 pieces of fabric for pocket (7" x 7" pieces x2 would be ample)
  • 16" of 1/2 or 3/4" wide elastic for waistband (make sure you measure around bubs waist first, as you may need longer elastic, so it is not too tight)
  • needle and thread
1. To begin, cut 2 rectangles 11" x 16" for your skirt.


2. Place the two rectangles right (printed) sides together. Pin down the shorter sides, and sew down each side using a 1/4" seam, so you are left with a tube, then press the seams flat.


3. Fold the top hem down 1/2" and press flat, then fold over another 1" and pin in place.


4. Sew a seam right along (1/10") the bottom edge of the hem, leaving an 1.5" gap.


5. Fold the bottom hem up 1/2" and press, and then fold over another 1/2" inch, pin and then sew into place as above but do not leave a gap.


6. Using a safety pin to guide, thread the elastic through the opening left in the top hem and all the way around until it comes out the other end of the opening, then sew the ends of elastic together, and sew the opening closed.


7. Cut out two pockets. You can do any shape you like, but you want them roughly 5.5" across and 4.5" down, I like to curve the bottom edge.


8. Pin the pockets together with printed sides in and sew around with a 1/8" seam, leaving a 1.5" gap on one side.


9. Snip off the corners, and clip around the curve at 1cm intervals. Clip up toward the seam, but stop before it so you don't cut the thread.


10. Turn the pocket right way out by pulling it through the opening left in the stitching. Then iron it nice and flat and hand sew the opening closed. I like to use a drawing stitch, or ladder stitch, for closing the gap as you can't see it. Quilt Taffy have a great little tutorial on this method.


11. Make a pleat in the top straight edge of the pocket. I do this by finding the centre, and folding the fabric in 1/2" either side. The back edge of the pleat (where my finger is in the pic below) should be about 1".


12. Pin the pleat in place, then sew along the top edge to secure the pleat.


13. Now pin the pocket in place on the front of the skirt, and sew it in place (again sewing about 1/8 - 1/10" from the edge of the pocket). The stitching will be visible on the outside of the pocket, so choose a matching colour if you do not want it to be too obvious. I like the stitching on the outside, so I tend to stick with white thread.


All done! Now just sit back, and enjoy seeing your cute little number on a gorgeous little someone.

xx

Wednesday, 26 September 2012

Patchwork Baby Quilt Tutorial


As I am sure I have said before, it is baby season in our life at present, and I decided I was in need of a new challenge. With a friend's baby shower coming up, I decided to attempt making a small quilt for the baby to play on. With my Mum, the master quilter, on hand for advice, I was ready to begin, and I was quite elated at how the quilt turned out. I am a bit of a cheat as no actual hand quilting was involved, so this is a relatively easy little number to put together.

To make your own patchwork baby quilt (finished quilt measuring 92cm x 69cm or 36" x 27") you will need:
  • 1 meter (1.5 yards) fabric for backing of quilt
  • 75cm (1 yard) each of two other fabrics for the face of the quilt
  • 1 meter (1.5 yards) of batting (we used 'Poly-down', a polyester, machine washable, non-allergenic batting available from quilt shops)
  • 4 metres (4.5 yards) of bias binding tape to match your quilt
  • cotton to match your fabrics
  • Curved safety pins (from fabric shops)
  • Masking tape

1. It's a good idea to wash, dry and iron all your fabric before you begin.


2. The quilt face is made up of 9 rectangles, 5 from one fabric and 4 from the other. Cut your pieces using a rotary cutter if you have one.

I wanted my finished quilt about 70cm x 90cm, so cut the blocks  32cm (12.5") x 25cm (9.5"), as we will include a 1/4" seam allowance.

3. Lay out the pieces in the pattern you would like them,
and then take the three pieces in each row, place them face to face and pin together. You should end up with three rows of three.

4. Using a 1/4" seam, sew the pieces together, then give a good iron.

5. Now place the rows face to face, pinning them in place, and then sew them together. Now you will have the completed face for the quilt.

6. Lay out the fabric for the backing of the quilt face down on a clean, flat surface and tape down the
edges with a little masking tape to secure.

If you like, you can spray the upward facing surface of the fabric with a quilt basting spray (available from fabric shops) which will leave the surface lightly tacky, and stop the batting moving around when you place it on.
  
7. Next we will lie the batting over the fabric and smooth it out. If using the spray, spray again before the next step.

8. Then lie the quilt top face up on top of the batting. The backing and the batting should overhang the edge of the face slightly as we haven't cut them to shape yet.

9. Now pin the three layers together. I used curved safety pins which make the job much easier, and pin all around the edge, along the seams and in the middle of each block.

10. Now we will sew along the seams of the quilt face to secure it in place. It is best to use a walking foot on your machine for this, as it helps feed the fabric through and prevents it bunching up.

11. Sew right along the seam lines of both the horizontal and vertical seams.

12. I was also wanting diagonal quilting on the face of the quilt. For this part, run a long line of masking tape from the corner of each square right across to the other corner and through to the other side of the quilt.

Make all the lines in one direction, then sew along the tape edge.

When all the lines are done, remove the tape and repeat for all the squares in the other direction.

13. Now run a seam an 1/8" in from the entire border of the quilt, then remove all the pins (if you haven't already done so). Don't worry about this seam, it will be hidden under the binding.

14. Next, trim up all the sides so you are left with a nice neat, straight edges.

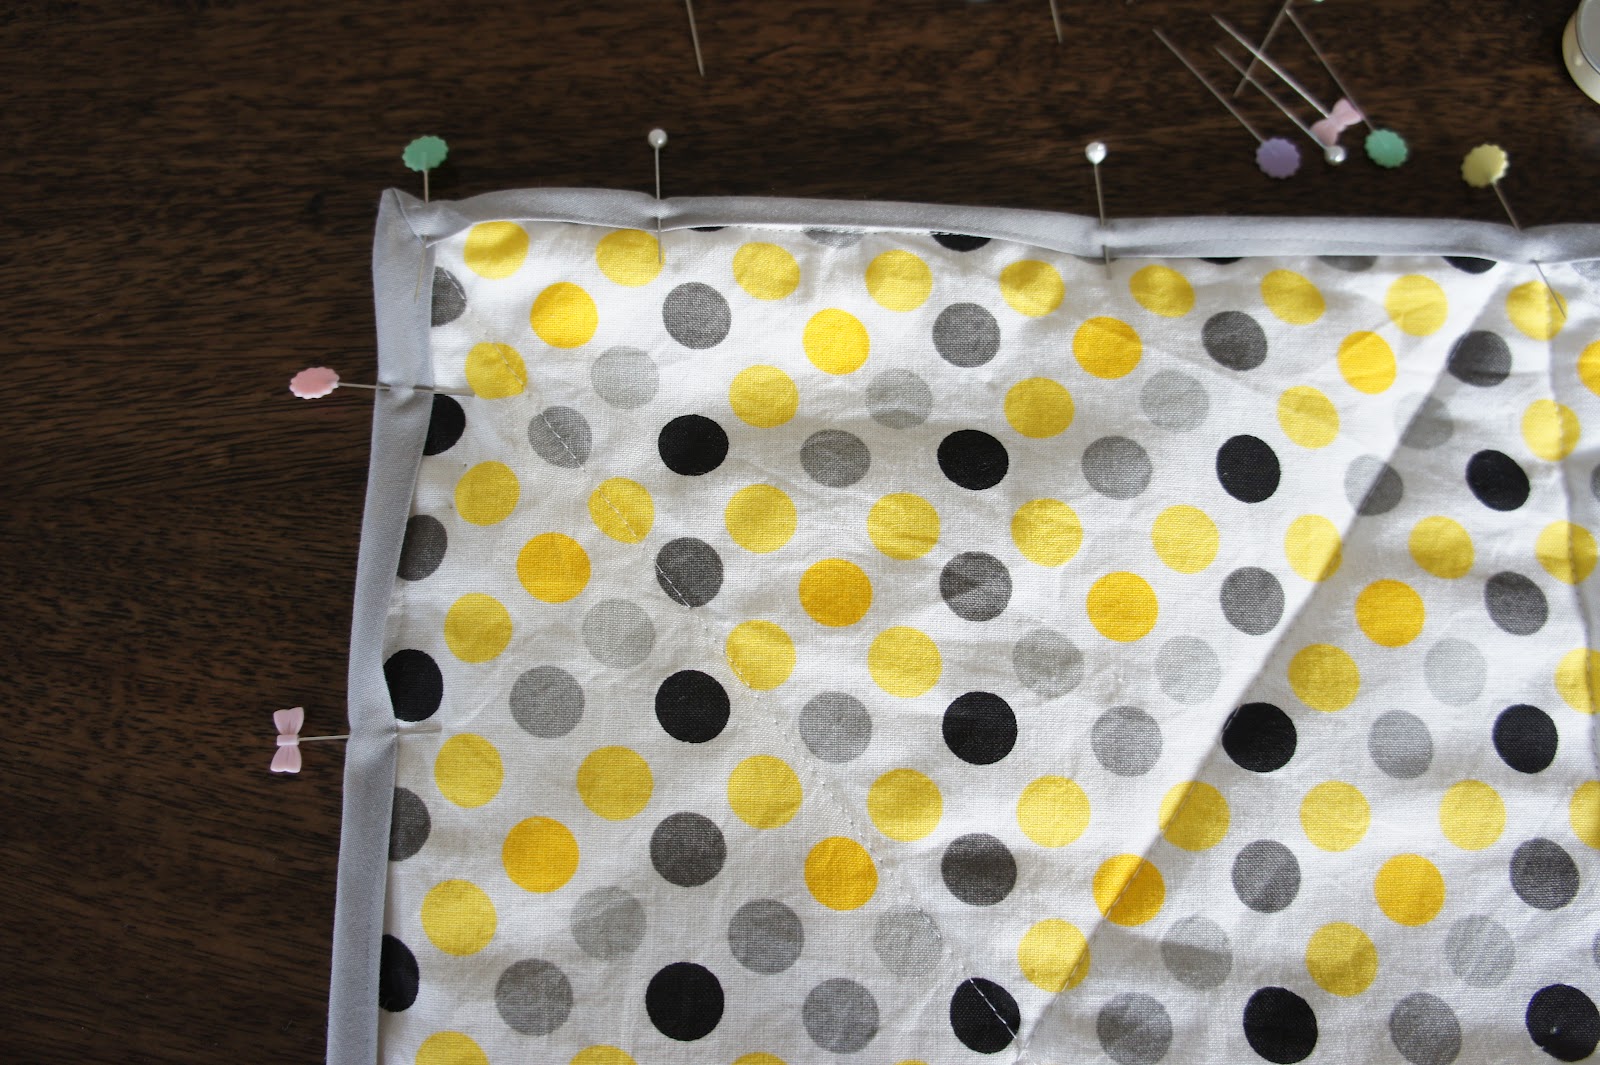
15. Now pin the bottom edge of the binding just under half it's width form the quilt edge (eg. if it is 1" thick, pin it a little less than 1/2" form the edge). 

For a nice finish, use mitred corners. 

(see 'Sew to Speak' for how to do this). 

16. Sew the binding down by sewing along the top fold of the binding, then flip it over the top and pin to the backing.

I then machine sew the binding down from this side too (because I am lazy), and to do this you sew it from the front side, right along the bottom of the binding, and this captures the other side too. For good tips on attaching the bias binding by machine see 'Little Chicken's No Swearing Method'.

This method didn't leave as nice a finish as it would if you hand sew it, which is what I will do in future. 

17. You are finished! Now sit back, and enjoy the thrill of having made something lovely, all the while thinking of someone you treasure and the little someone about to bless their lives!

xx

Monday, 16 July 2012

My baby's bunting


We recently had our beautiful Ruby Grace baptised, and celebrated with a small lunch back at our house. In her honour, I wanted to make something pretty for decoration and decide on some bunting to hang behind the food table, with the intention to then hang them in her nursery afterwards. I scoured the internet for a pattern that I liked, and after many slight variations this was how I got on.

For one 3 metre garland (2.3m of flags, with room at each end to tie) you will need:

  • Cardboard triangle measuring 12.5cm along the base, and 17.5cm on the other two sides
  • 7 different but complimentary fabrics
  • 3 metres of inch wide bias tape

1. Wash, dry and press your fabrics and the bias tape.

2. Using your cardboard triangle template, cut six triangles (3 pairs) out of each of your fabrics.


3. Place two triangles of the same fabric face to face, and sew down the two long sides, from base to tip, leaving the base completely open.

4. Snip the tip off the end, and turn right side out. You may need to poke a pencil into the tip to get it to come to a nice point on the right side, then give it a really good iron. Trim any extra seams that poke out from base so you have a nice straight base edge.


5. Repeat with remaining pairs of triangles so you end up with 21 completed pendants.


6. Fold the bias tape in half and press well, then lie the tape out flat along the table (or floor if your table is shorter).
Leave a 35cm length of tape at each end (to be used later to tie up your bunting), then start placing the bases of the pendants corner to corner along the inner fold if the bias tape.


7. When you are happy with the order of your pendants, pin them into place and sew a seam all the way along the row, about 5mm from the edge of the tape. I actually sewed two seams one a few mm lower to make sure they are really secure.


That's it! I loved making these, and found it a really pleasant way to spend a Sunday "crafternoon", and they looked very pretty on the day.

xx